The ServiceNow Integration feature is available from Octopus 2022.3 onwards and requires an enterprise subscription. Contact us to request a trial.
Overview
The Octopus Deploy/ServiceNow integration allows you to block the execution of specifically configured deployments unless they have a corresponding approved ServiceNow Change Request (CR).
To enable this behavior, both the Octopus Project and Environment you are deploying to must be configured and the ServiceNow configuration is set up before deployments can be managed.
| Project | Environment | Outcome |
|---|---|---|
| Change controlled | Change controlled | Approval required for deployment |
| Not Change controlled | Change controlled | No approval required |
| Change controlled | Not Change controlled | No approval required |
Getting started
The ServiceNow integration requires Octopus 2022.3 or later and an Octopus enterprise subscription.
Your ServiceNow instance must have the following modules installed and activated:
- Change Management
- Change Management Standard Change Catalog
- Change Management State Model
These are typically available as part of the ServiceNow ITSM product
Before you can use the Octopus Deploy/ServiceNow integration, you’ll need to:
- Configure ServiceNow OAuth credentials (for use by Octopus).
- Request an enterprise license which is required to enable the ServiceNow feature.
- Install the enterprise license (for Self-hosted customers only)
- Configure a connection from Octopus to ServiceNow.
- Configure which deployments require an approved CR.
Configuring ServiceNow
The instructions in this section will require a ServiceNow Administrator.
The Octopus Deploy / ServiceNow integration requires security configuration in your target ServiceNow instance.
Follow the ServiceNow OAuth documentation to configure an OAuth endpoint for Octopus to use for authentication. Take note of the OAuth client id and client secret from the configuration.
Next, the integration will require a user account in ServiceNow. The recommendation is to create a service account specifically for Octopus, once created the user must be assigned the following two roles:
sn_change_readsn_change_write
Ensure that the new user has the Web service access only checkbox checked.
Take note of the password assigned or generated for this user.
Licensing
For the ServiceNow approval checks to be performed as part of the deployment process, an enterprise license must be configured in your Octopus instance. This license must be requested from Octopus directly and cannot be managed through the self-service process.
For Self-hosted customers, once you have received your enterprise license, you can install it by navigating to Configuration ➜ License. For Octopus Cloud customers, the license will be applied automatically for you.
An enabled license will include a block similar to below:
<Features>
  <ServiceNowIntegration>
    <ValidTo>...</ValidTo>
  </ServiceNowIntegration>
</Features>
Configuring ServiceNow connections
The instructions in this section will require an Octopus Deploy Manager or Administrator
To connect your Octopus Deploy instance to ServiceNow, navigate to Configuration ➜ Settings ➜ ServiceNow Integration.
Check the Enabled option
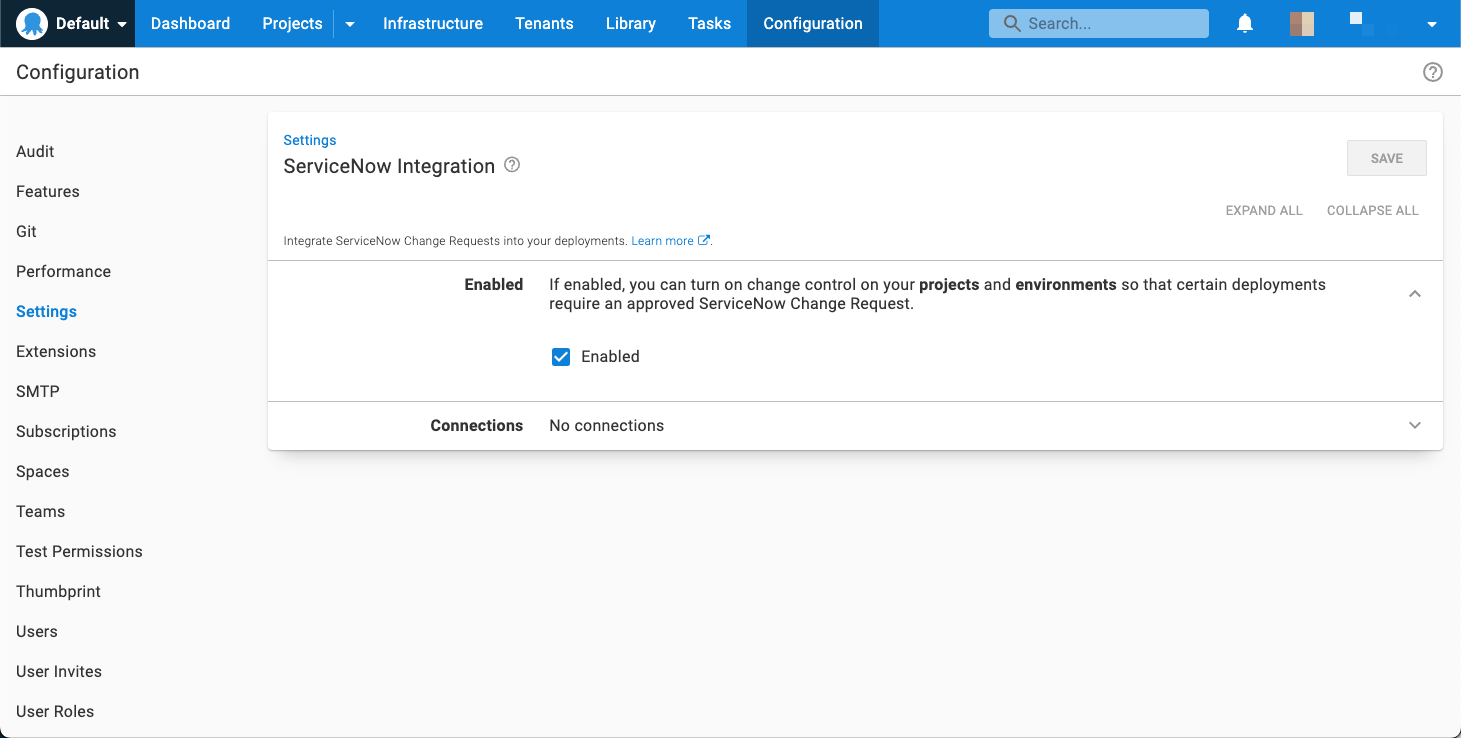
Click on ADD CONNECTION and fill out the details.
The ServiceNow Base Url should be the root URL and include the protocol e.g. https://
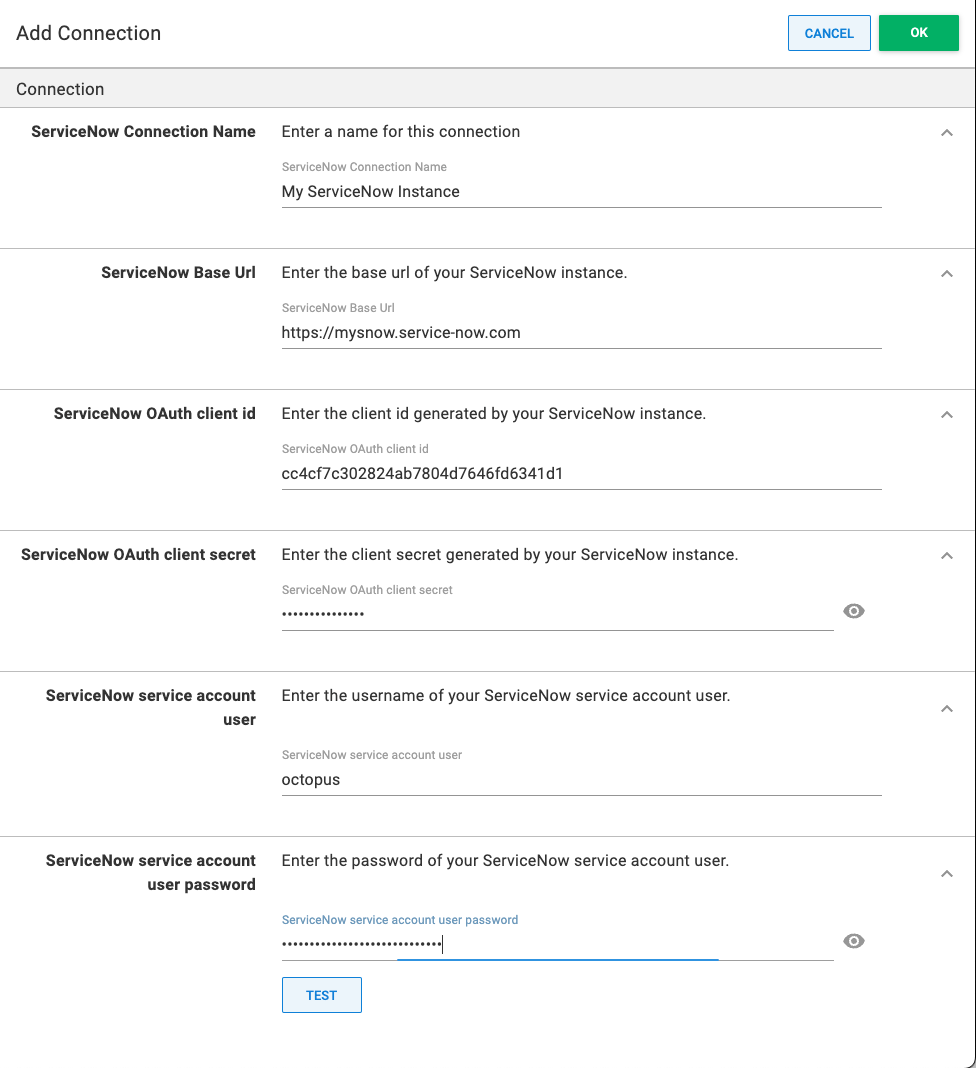
Press TEST to ensure that the connection details are working.
Multiple ServiceNow connections are supported, however, each project can only use one ServiceNow connection.
Configuring Work Notes
This feature is only available for version 2022.3.1274 and later
The instructions in this section will require an Octopus Deploy Manager or Administrator
If enabled, this feature will result in a linked change request having one or more Work Notes added during the deployment lifecycle which record details about the deployment and its execution status.
To enable this feature navigate to Configuration ➜ Settings ➜ ServiceNow Integration, click the Work Notes Enabled checkbox show below then click Save.

Configuring deployments
To enforce a deployment to require an approved CR, the Change Controlled setting needs to be enabled in both the project and the environment it is being deployed to.
Setting up projects for CR approval
To enable a project to enforce a requirement for an approved CR:
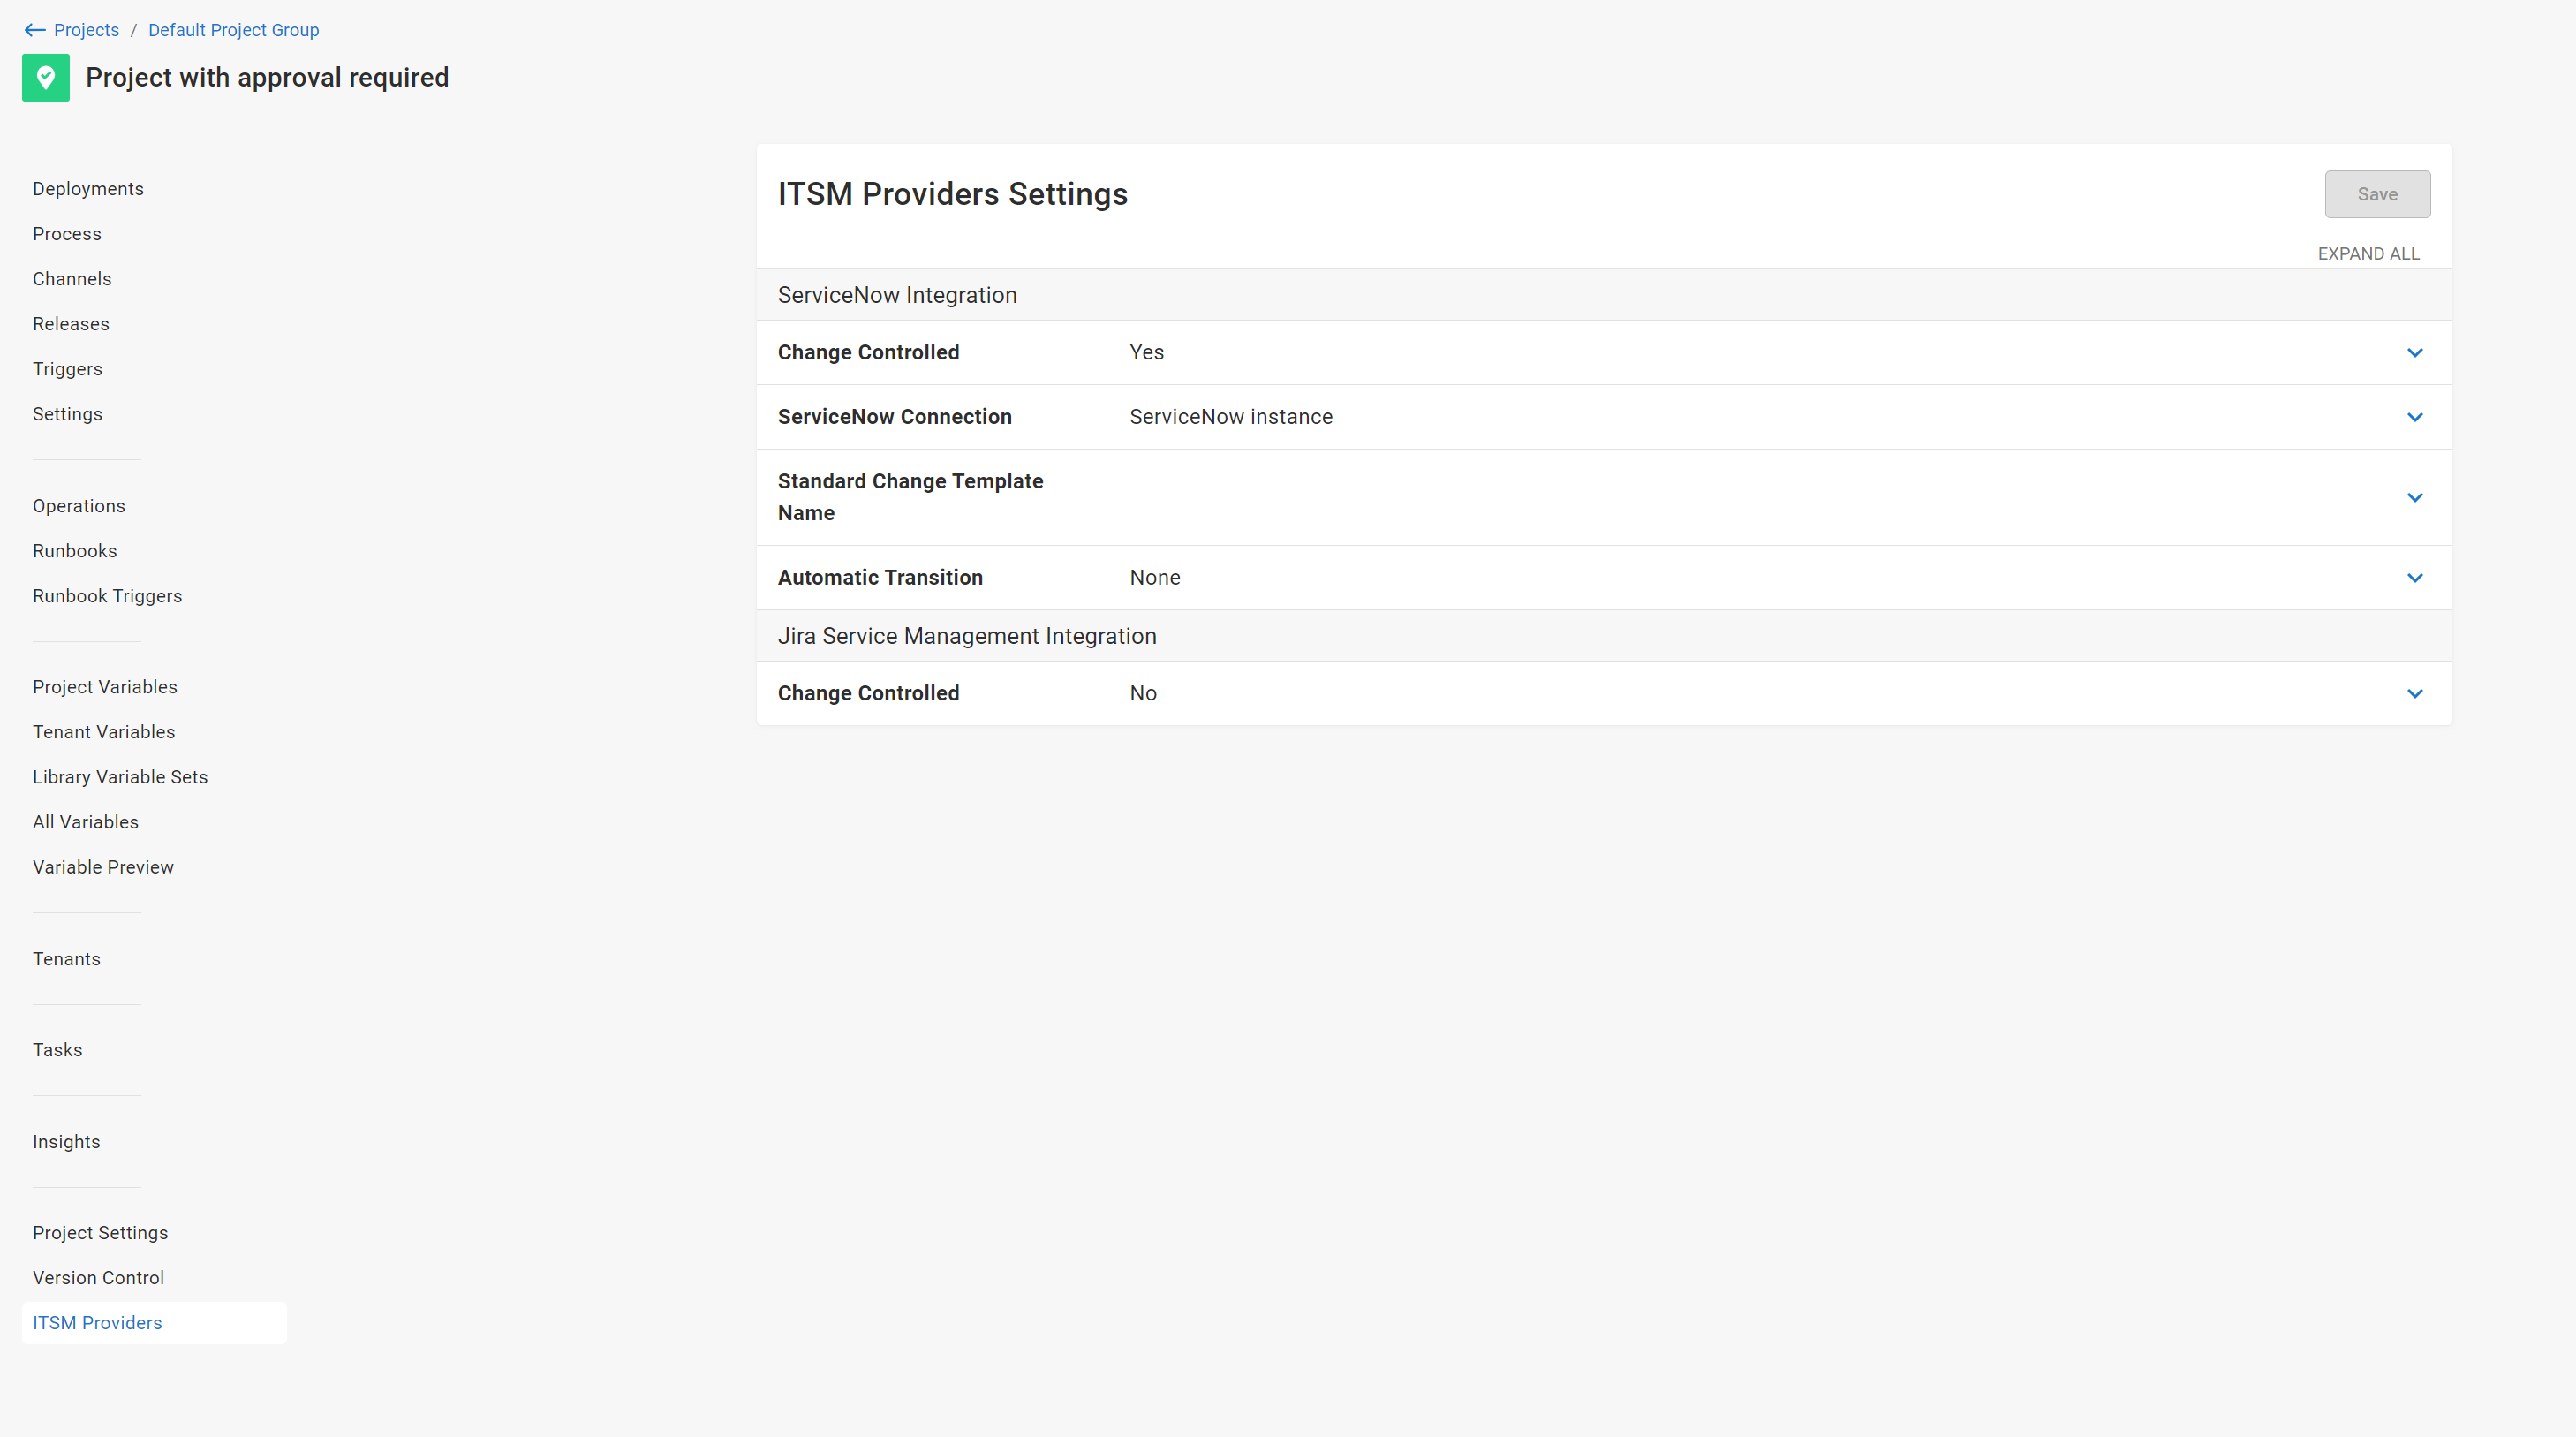
- Navigate to the project and then Settings ➜ ITSM Providers.
- Check the Change-controlled setting.
- Select your ServiceNow connection in the ServiceNow Connection setting and click SAVE.
Standard, Normal, and Emergency Changes
By default, deployments resulting in CR creation will produce a Normal change (i.e. one
requiring explicit approval).
Setting the Standard Change Template Name setting under ITSM Providers to the name of an
active, approved Standard Change Template (as found in the Standard Change Catalog) will instead
result in deployments of the project creating a Standard (i.e. low-risk, pre-approved) change.
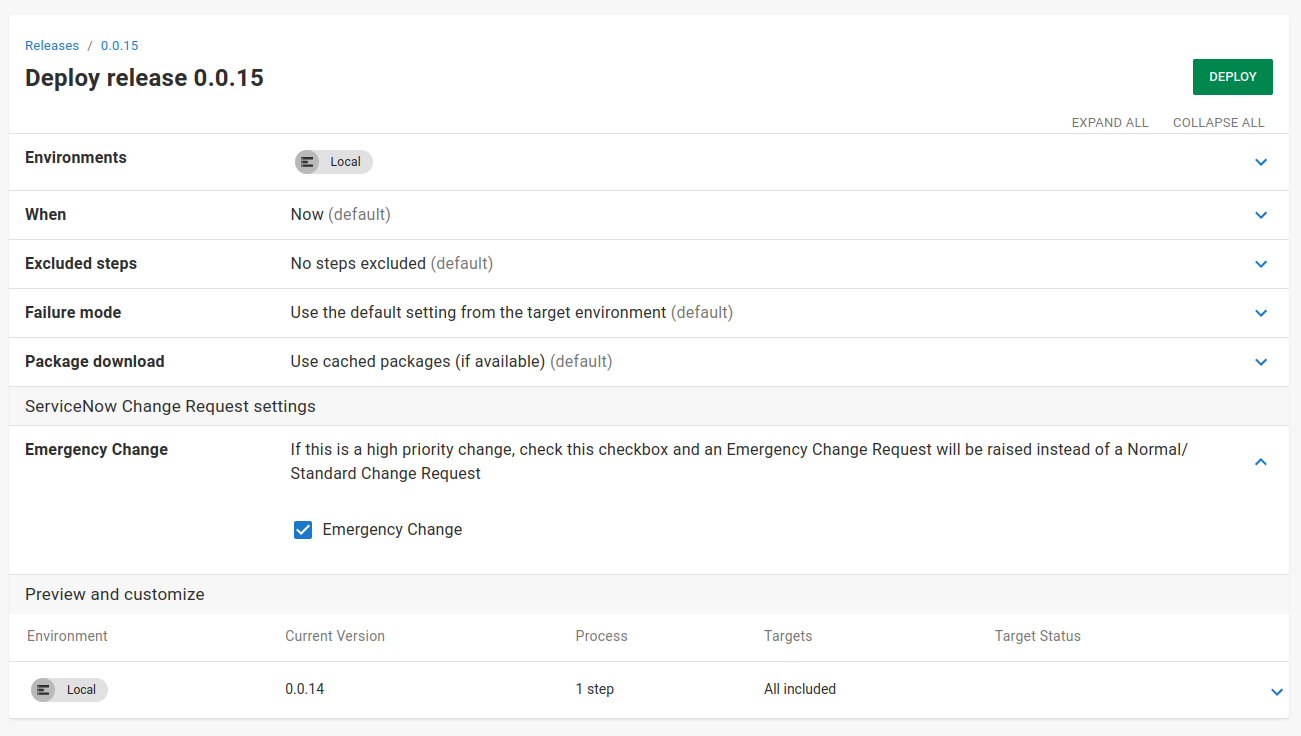
From 2024.2 you can create an Emergency change by selecting the Emergency Change setting on the deployment creation page.
Supplying the CR number to a deployment
If you add a variable to your project named Octopus.ServiceNow.ChangeRequest.Number, then a CR will not be created, and instead, the supplied CR number will be used during the approval check. This variable can also be scoped.
From 2024.2 on this can be set under the ServiceNow Change Request settings section on the deployment creation page. Setting the CR number at the deployment level will override any predefined variable.
Setting up environments for CR approval
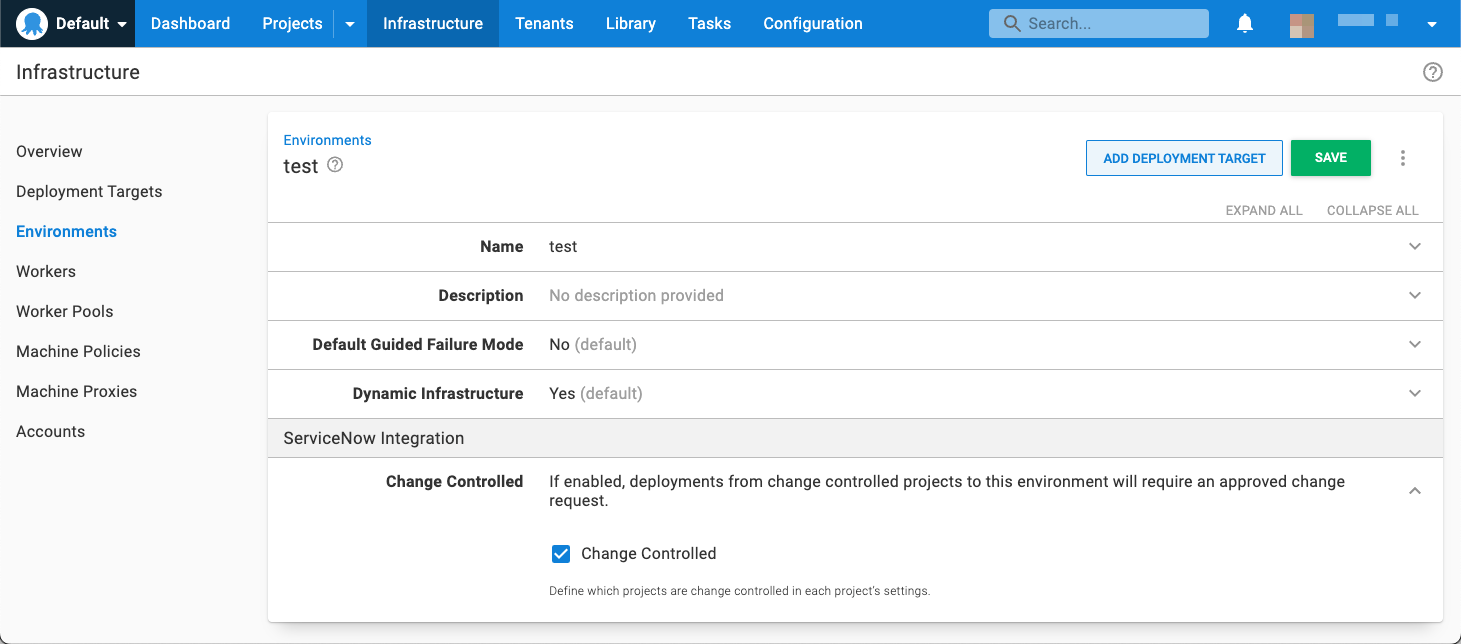
To enable an environment to enforce a requirement for an approved CR, navigate to Infrastructure ➜ Environments, edit the environment via the overflow menu and check the Change Controlled setting, and then press SAVE.
Continuous Delivery (CD) audit record
This feature is only available for version 2022.3.7086 and later
This feature allows a CD workflow using standard changes as audit records at the project level. When enabled a standard change will be created and moved to the Implement state, the deployment will execute and then the linked change will be moved to the Review or Closed state.
CD audit record functionality is enabled under ITSM Providers. First set a valid Change Template Name then turn on the Automatic Transition selection to your desired completion state and click Save as per the following screenshot.

How it works
Deployments where both the project and environment have Change Controlled enabled, will query ServiceNow for an approved CR before execution can begin.
When a Change Controlled deployment is evaluated for approval, the following checks are performed:
- If a specific CR number is available, via a variable named
Octopus.ServiceNow.ChangeRequest.Number, then only this CR will be checked. - If there is an existing CR with the specifically formatted Short Description available. See Title text matching for more information, then this CR will be evaluated.
- Create a new CR.
- This will be a
Normalchange, or aStandardchange if the project has aChange Template Nameset. - A CR created by Octopus will have a Short Description in the format outlined in Title text matching unless over-ridden by a variable.
- This will be a
When re-deploying a previous deployment, the same CR will be used if it is still open. If it is closed the above process will be followed again.
Once a CR has been found, the deployment will only proceed if the State of the CR is Implement. If the State is either New, Assess, Authorize, or Scheduled the deployment will wait. Any other State will cause the deployment task to fail.
The only supported states are those defined in the default CR lifecycle
If the deployment is scheduled to execute in the future, then a CR will be created at the scheduled deployment time, and not when the deployment was requested.
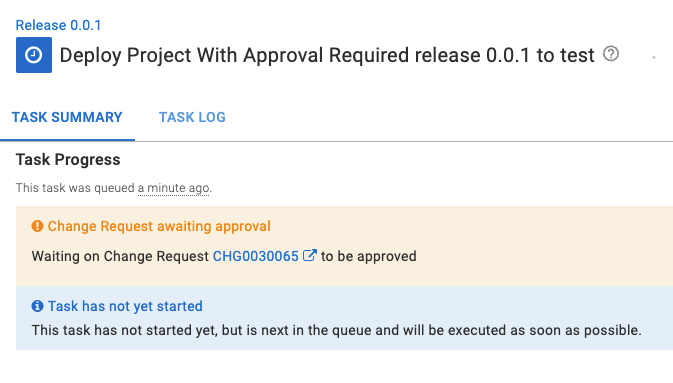
The number of the CR created or found will appear in the Task Summary tab of the executing Octopus deployment task. Clicking on the CR number in the message will navigate you to the CR in ServiceNow.
Title text matching
Octopus supports matching a CR by setting the Short Description of the CR to a well-known format:
Octopus: Deploy "{project name}" version {release version number} to "{environment name}"
e.g Octopus: Deploy "Web Site" version 1.0.1-hotfix-001 to "Dev"
The title must match the format exactly, including the double-quotes.
Populating CR fields through Octopus
This feature is only available for version 2024.2.6455 and later
To control the content of the CRs the variable Octopus.ServiceNow.Field[snow_field] can be set at the project level. These are contributed to the create CR body as a dictionary allowing any field to be set.
For example to set the Assigned To or Short Description fields you can use the following:
| Field | Variable | Example Value |
|---|---|---|
| Assigned To | Octopus.ServiceNow.Field[assigned_to] | beth.anglin |
| Short Description | Octopus.ServiceNow.Field[short_description]Custom Short Description with #{SomeVariable} #{Octopus.Deployment.Id} |
Setting a Short Description will over-ride the auto generated Octopus description. Title text matching means this will automatically progress the deployment unless the resolved description is unique. This can be done by including variables like the deployment or environment Id.
The expected ServiceNow value doesn’t always align with the displayed value. In the case of Assigned To the value displayed is Beth Anglin but the expected value is the User ID in this case beth.anglin.
For a full list of available fields and values refer to the ServiceNow docs.
Respecting change windows
This feature is only available for version 2022.3.3026 and later
In addition to a change request being approved, a change must also be in its schedule change window in order for the deployment to execute. The change window is controlled by the Planned start date and Planned end date on the linked change request.
The following list assumes the linked change is in an approved state.
- If no
Planned start dateandPlanned end dateare specified there is no change window and the deployment will execute. - If only a
Planned start dateis set the deployment will execute on or after the defined date. - If only a
Planned end dateis set the deployment will execute on or before the defined date. - If
Planned start dateandPlanned end dateare specified the deployment will execute on or between the defined dates.
If at any time a Planned end date is exceeded and the linked change request is not approved, the deployment will be terminated.
Known Issues and limitations
- Once a CR is deemed to be related to a deployment, then only this CR will be evaluated for the deployment to proceed. If the CR is incorrect, you will need to cancel the deployment, close the CR and try the deployment again.
- Each project only supports a single ServiceNow connection.
- Each project only supports supplying the same Change Template Name across all environments in the Lifecycle attached to the project or channel.
Troubleshooting
Errors occurring during a deployment approval checks will appear in the “Task Failed” icon’s tooltip. From 2024.2 on errors related to creating a change request are available through the task log. Additional information will also be available in the “System Diagnostic Report”.
If you are seeing errors in Octopus during deployments, ensure that the ServiceNow user account is authorized to call the required endpoints.
The ServiceNow integration uses the following REST endpoints:
| Purpose | HTTP Method | Path | Notes |
|---|---|---|---|
| Authorize | POST | /oauth_token.do | |
| Search for changes | GET | /api/sn_chg_rest/change | |
| Create change | POST | /api/sn_chg_rest/change/normal | |
| Search for Standard Change templates | GET | /api/sn_chg_rest/change/standard/template | Requires project Change Template Name configuration |
| Create Standard Change from template | POST | /api/sn_chg_rest/change/standard/{templateId} | Requires project Change Template Name configuration |
| Approve Standard Change | PATCH | /api/sn_chg_rest/change/{changeId} | Requires project Automatic Transition configuration |
| Add work notes | PATCH | /api/sn_chg_rest/change/{changeId} | Requires Work Notes Enabled ServiceNow global configuration |
Help us continuously improve
Please let us know if you have any feedback about this page.
Page updated on Tuesday, April 23, 2024