There is always a risk an in-place upgrade will fail. The risk increases as more versions have been released between upgrades. We do our best to test many different configurations to put downward pressure on that risk. However, we can’t cover every hyper-specific scenario. Also, there might be a new feature, or a breaking change introduced. Creating a test instance will help you reduce the risk for you and your company.
Overview
There are two approaches to creating a test instance:
- Subset of projects representing the main instance.
- Clone of the main instance.
Test instance with a subset of projects
Setting up a test instance with a subset of projects over a full clone has several advantages.
- It is much easier to set up and configure than a clone. It is also easy to automate the setting up and tearing down a test instance on demand.
- There is tooling in place to export specific projects.
- A clone does a full clone of everything, including deployment targets and triggers, increasing the risk of having the sandbox instance connect to production when the instance initially starts up. You will need to disable all the targets to prevent this from happening.
- A clone might have hidden configuration options, such as server folders, that you have to change.
The disadvantage of a subset of projects over a full clone is that there could be significant drift between projects, and you might miss something.
The process to create an instance with a subset of projects is:
- Download the same version of Octopus Deploy as your main instance.
- Install Octopus Deploy on a new VM.
- Export a subset of projects from the main instance.
- Import that subset of projects to the test instance.
- Download the latest version of Octopus Deploy.
- Upgrade the test instance to the latest version of Octopus Deploy.
- Test and verify the test instance.
Downloading the same version of Octopus Deploy
Migrating data from Octopus to a test instance requires both the main instance and test instance to be on the same version. You can find the version you are running by clicking on your name in the top right corner of your Octopus Deploy instance.

You can find all the previous versions on the previous versions download page.
Installing Octopus Deploy
Run the MSI you downloaded to install Octopus Deploy. After you install Octopus Deploy, the Octopus Manager will automatically launch. Follow the wizard. A few notes:
- You can reuse your same license key on up to three unique instances of Octopus Deploy. We determine uniqueness based on the database it connects to. If you are going to exceed the three instance limit, please contact us to discuss your options.
- Create a new database for this test instance. Restoring a backup will cause Octopus to treat this as a cloned instance, with the same targets, certificates, and keys.
- Run the test instance database on the same version of SQL Server as the main instance. Only deviate when you plan on upgrading SQL Server.
Export/import subset of projects using export/import projects feature
The Export/Import Projects feature added in Octopus Deploy 2021.1 can be used to export/import projects to a test instance. Please see the up to date documentation to see what is included.
Export subset of projects using the data migration tool
All versions of Octopus Deploy since version 3.x has included a data migration tool. The Octopus Manager only allows for the migration of all the data. We only need a subset of data. Use the partial export command-line option to export a subset of projects.
Run this command for each project you wish to export on the main, or production, instance. Create a new folder per project:
Octopus.Migrator.exe partial-export --instance=OctopusServer --project=AcmeWebStore --password=5uper5ecret --directory=C:\Temp\AcmeWebStore --ignore-history --ignore-deployments --ignore-machinesThis command ignores all deployment targets to prevent your test instance and your main instance from deploying to the same targets.
Import subset of projects using the data migration tool
The data migration tool also includes import functionality. First, copy all the project folders from the main instance to the test instance. Then run this command for each project:
Octopus.Migrator.exe import --instance=OctopusServer --password=5uper5ecret --directory=C:\Temp\AcmeWebStoreDownloading the latest version of Octopus Deploy
The downloads page will always have the latest version of Octopus Deploy. If company policy dictates you install an older version, for example, the latest version is 2020.4.11, but you can only download 2020.3.x, then visit the previous downloads page.
Install the latest version of Octopus Deploy
Installing a newer version of Octopus Deploy is as simple as running MSI and following the wizard. The MSI will copy all the binaries to the install location. Once the MSI is complete, it will automatically launch the Octopus Manager.
Testing the upgraded instance
It is up to you to decide on the level of testing you wish to perform on your upgraded instance. At a bare minimum, you should:
- Do test deployments on projects representative of your instance. For example, if you have IIS deployments, do some IIS deployments. If you have Java deployments, do some Java deployments.
- Check previous deployments, ensure all the logs and artifacts appear.
- Ensure all the project and tenant images appear.
- Run any custom API scripts to ensure they still work.
- Verify a handful of users can log in, and that their permissions are similar to before.
- Build server integration; ensure all existing build servers can push to the upgraded server.
We do our best to ensure backward compatibility, but it impossible to cover every user scenario for every possible configuration. If something isn’t working, please capture all relevant screenshots and logs and send them over to our support team for further investigation.
Test instance is a clone
Setting up a test instance as a clone of the main instance has a few advantages over a subset of projects.
- Upgrades are much closer to a one to one comparison.
- You can do a full test of all integrations with Octopus Deploy.
Configuring a clone typically takes much more time and compute resources. There are backup locations to consider, targets to disable, and more.
Creating a clone of an existing instance involves:
- Finding and backing up your Master Key.
- Enabling maintenance mode on the main instance.
- Backing up the database of the main instance.
- Disabling maintenance mode on the main instance.
- Restoring the backup of the main instance’s database as a new database on the desired SQL Server.
- Downloading the same version of Octopus Deploy as your main instance.
- Installing that version on a new server and configuring it to point to the cloned database.
- Copying all the files from the backed up folders from the source instance.
- Optionally, disabling targets on the cloned instance.
- Download the latest version of Octopus Deploy.
- Upgrade the test instance to the latest version of Octopus Deploy.
- Test and verify the test instance.
Finding and backing up your Master Key
When connecting an existing Octopus database to a “new” Octopus instance, either due to migration or for testing, you will need the Master Key to gain access to the database during the Octopus instance setup process.
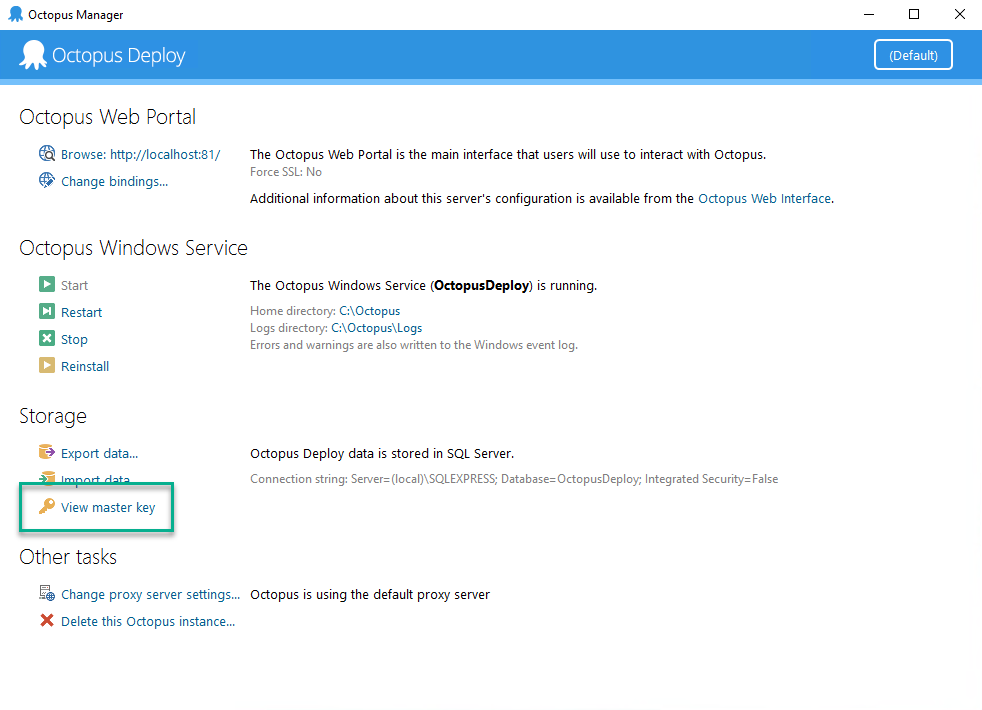
To obtain your existing Master Key from your source Octopus instance, you can simply open Octopus Manager then select “View master key” as shown below:

Alternatively, you may also use the show-master-key command via the Octopus.Server.exe command-line tool. You can find more information on this here.
For Octopus Server instances hosted in Linux containers, you may use the container exec command per the instructions here.
Maintenance mode
Maintenance mode prevents non-Octopus Administrators from doing deployments or making changes. To enable maintenance mode go to Configuration ➜ Maintenance and click the button Enable Maintenance Mode. To disable maintenance mode, go back to the same page and click on Disable Maintenance Mode.
Backup the SQL Server database
Always back up the database before upgrading Octopus Deploy. The most straightforward backup possible is a full database backup. Execute the below T-SQL command to save a backup to a NAS or file share.
BACKUP DATABASE [OctopusDeploy]
          TO DISK = '\\SomeServer\SomeDrive\OctopusDeploy.bak'
             WITH FORMAT;
The BACKUP DATABASE T-SQL command has dozens of various options. Please refer to Microsoft’s Documentation or consult a DBA as to which options you should use.
Restore backup of database
Use SQL Server Management Studio’s (SSMS) built-in restore backup functionality. SSMS provides a wizard to make this process as pain-free as possible. Be sure to consult a DBA or read up on Microsoft’s Documentation.
Downloading the same version of Octopus Deploy
Migrating data from Octopus to a test instance requires both the main instance and test instance to be on the same version. You can find the version you are running by clicking on your name in the top right corner of your Octopus Deploy instance.

You can find all the previous versions on the previous versions download page.
Installing Octopus Deploy
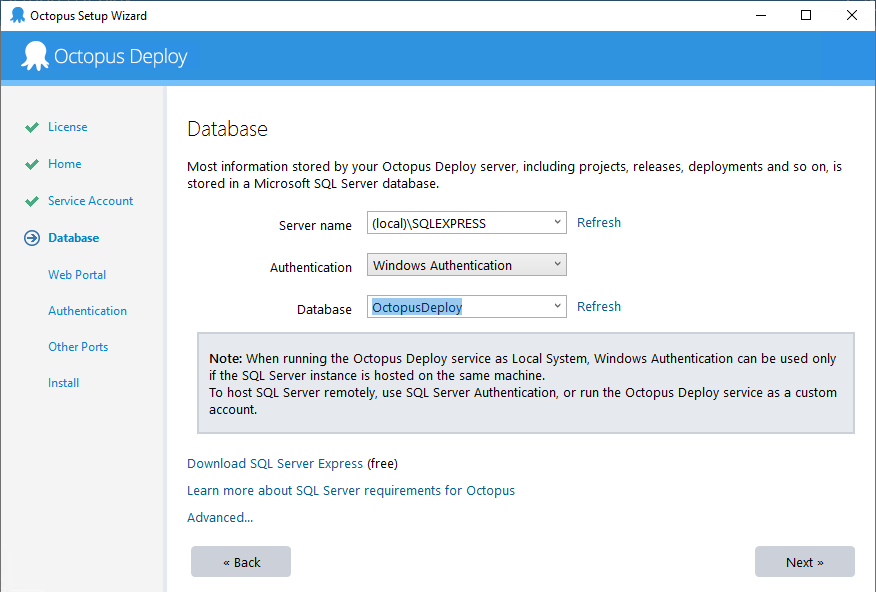
Run the MSI you downloaded to install Octopus Deploy. Once the MSI is finished, the Octopus Manager will automatically launch. Follow the wizard, and on the section where you configure the database, select the pre-existing database.

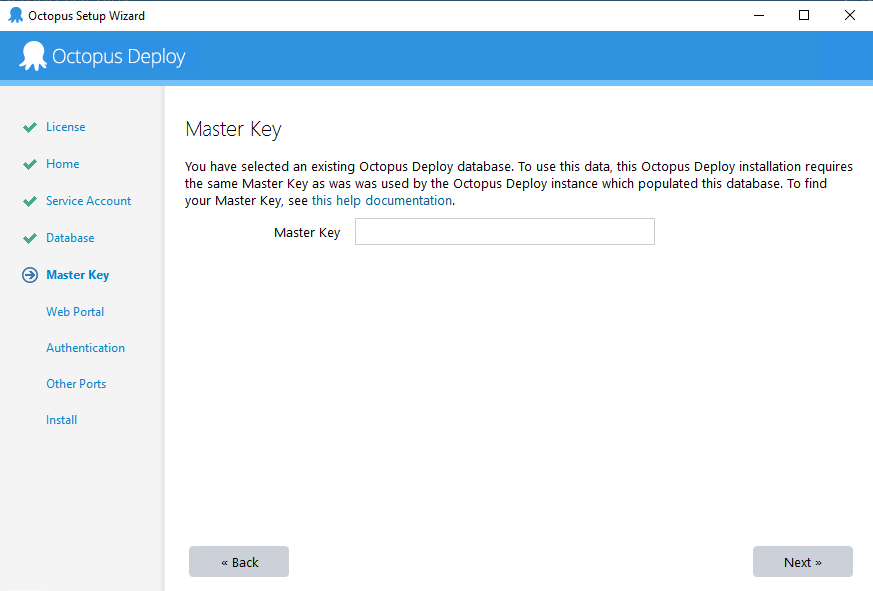
Selecting an existing database will ask you to enter the Master Key.

Enter the Master Key you backed up earlier, and the manager will verify the connection works.
Finish the wizard, keep an eye on each setting to ensure you match your main instance. For example, if your main instance uses Active Directory, your cloned instance should also be configured to use Active Directory. After the wizard is finished and the instance is configured, log in to the cloned instance to ensure your credentials still work.
Copy all the files from the main instance
After the instance has been created, copy all the contents from the following folders.
- Artifacts, the default is
C:\Octopus\Artifacts - Packages, the default is
C:\Octopus\Packages - Tasklogs, the default is
C:\Octopus\Tasklogs - EventExports, the default is
C:\Octopus\EventExports
Failure to copy over files will result in:
- Empty deployment screens
- Missing packages on the internal package feed
- Missing project or tenant images
- Missing archived events
- And more
Update the Instance ID
Cloning an instance includes the unique Installation ID of your original instance. This ID is used to identify the instance by a few integrations and sending telemetry reports.
You can run this SQL Script on your cloned instance database to generate a new unique installation ID.
DECLARE @config NVARCHAR(1000)
DECLARE @oldguid  NVARCHAR(255)
DECLARE @newguid  NVARCHAR(255)
DECLARE @dryRun BIT = 1 -- set this to 0 to update the Installation Id

SET @newguid = LOWER(CONVERT(NVARCHAR(255), NEWID()))

SELECT @config =[JSON]
FROM dbo.Configuration
WHERE Id = 'upgradeavailability'

SET @oldguid = JSON_VALUE(@config, '$.InstallationId')
SET @config = JSON_MODIFY(@config, '$.InstallationId', @newguid)

PRINT 'The old Installation Id is ' + @oldguid + ' - Save this value'
PRINT 'The new Installation Id will be ' + @newguid

IF @dryRun = 1
	PRINT 'This is a dry run, no update is occurring. Set @dryrun to 0 to update the Installation Id.'
ELSE
	PRINT 'The Installation Id is being updated. Restart your Octopus Server service for this change to take effect.'

UPDATE dbo.Configuration
SET [JSON] = @config
WHERE Id = 'upgradeavailability'
  AND @dryRun = 0
The script is set to do a dry run of what will change. Change @dryRun to 0 to make the change on your instance.
Disabling all Targets/Workers/Triggers/Subscriptions - optional
Cloning an instance includes cloning all certificates. Assuming you are not using polling Tentacles, all the deployments will “just work.” That is by design if the VM hosting Octopus Deploy is lost and you have to restore Octopus Deploy from a backup.
Just working does have a downside, as you might have triggers and other items configured. These items could potentially perform deployments. You can run this SQL Script on your cloned instance to disable everything.
Use [OctopusDeploy]
go
DELETE FROM OctopusServerNode
IF EXISTS (SELECT null FROM sys.tables WHERE name = 'OctopusServerNodeStatus')
    DELETE FROM OctopusServerNodeStatus
UPDATE Subscription SET IsDisabled = 1
UPDATE ProjectTrigger SET IsDisabled = 1
UPDATE Machine SET IsDisabled = 1
IF EXISTS (SELECT null FROM sys.tables WHERE name = 'Worker')
    UPDATE Worker SET IsDisabled = 1
DELETE FROM ExtensionConfiguration WHERE Id in ('authentication-octopusid', 'jira-integration')
Remember to replace OctopusDeploy with the name of your database.
Downloading the latest version of Octopus Deploy
The downloads page will always have the latest version of Octopus Deploy. If company policy dictates you install an older version, for example, the latest version is 2020.4.11, but you can only download 2020.3.x, then visit the previous downloads page.
Install the latest version of Octopus Deploy
Installing a newer version of Octopus Deploy is as simple as running MSI and following the wizard. The MSI will copy all the binaries to the install location. Once the MSI is complete, it will automatically launch the Octopus Manager.
Testing the upgraded instance
It is up to you to decide on the level of testing you wish to perform on your upgraded instance. At a bare minimum, you should:
- Do test deployments on projects representative of your instance. For example, if you have IIS deployments, do some IIS deployments. If you have Java deployments, do some Java deployments.
- Check previous deployments, ensure all the logs and artifacts appear.
- Ensure all the project and tenant images appear.
- Run any custom API scripts to ensure they still work.
- Verify a handful of users can log in, and that their permissions are similar to before.
- Build server integration; ensure all existing build servers can push to the upgraded server.
We do our best to ensure backward compatibility, but it impossible to cover every user scenario for every possible configuration. If something isn’t working, please capture all relevant screenshots and logs and send them over to our support team for further investigation.
Help us continuously improve
Please let us know if you have any feedback about this page.
Page updated on Thursday, June 6, 2024